Showing posts with label dessert. Show all posts

Wednesday, August 15, 2018

chocolate mint cake


Chocolate Mint Dream Bars
These Chocolate Mint Dream Bars are the perfect No-Bake dessert. The cookie crust, chopped Andes Mints, peppermint, pudding and whipped topping will have everyone swooning! 
Crust
  • 1 15.25 package Mint Oreo cookiesdivided
  • 5 tablespoons unsalted butter
  • 1 1- lb. package Andes Mintschopped, divided
Peppermint Layer
  • 4 ounces cream cheese room temperature
  • 1/2 cup confectioners’ sugar
  • 1/4 teaspoon peppermint extract
  • 5 - 7 drops green food coloring
  • Pudding Layer
    • 1 3.9- ounce box chocolate fudge pudding
    • 1 1/2 cups milk
    • 1 8- ounce container Cool Whip or 1 recipe of my Stabilized Whipped Cream divided
    • Hershey’s chocolate bar shavings

https://www.365daysofbakingandmore.com/chocolate-mint-dream-bars/

Instructions
  1. Prepare an 8 X 8-inch baking ban by lining it with parchment so that the edges come up on the sides, enabling you to easily remove the bars from the pan to slice before serving.
Crust
  1. Place 24 Mint Oreos into a food processor and pulse to finely ground into crumbs.
  2. In a medium microwavable bowl, melt butter for 20 - 30 seconds.
  3. Pour the cookie crumbs into the butter and mix well.
  4. Place the crumbs into the prepared baking pan and pat down firmly, spreading to all of the edges.
  5. Put the pan into the freezer to set for a minimum of 30 minutes.
Peppermint Cream Cheese
  1. In a mixing bowl, beat the cream cheese until soft.
  2. Add the confectioners’ sugar, peppermint extract and 5 drops of green food coloring.
  3. Beat until thoroughly combined, scraping down the sides and bottom of the mixing bowl.
  4. If desired, add more green food coloring until desired hue is reached.
  5. Fold in one cup of Cool Whip until well mixed.
Pudding
  1. In a medium bowl, whisk together the chocolate fudge pudding and milk.
  2. Place into refrigerator to set.
Assembly
  1. Chop 30 of the Andes Mints and evenly distribute them on top of the crust.
  2. Place dollops of the peppermint cream cheese on top of the chopped mints and gently spread to the edges of the pan.
  3. Place dollops of pudding on top of the cream cheese and gently spread.
  4. Evenly (spread) the remaining Cool Whip over the pudding.
  5. Place pan into the refrigerator for a minimum of two hours.
  6. A half hour before serving, place pan into freezer. This will allow it to be sliced easily.
  7. Chop the remaining Andes Mints.
  8. Make chocolate curls by making thin slices along the side of the Hershey bar.
  9. When ready to serve, lift bars out of the pan by the parchment.
  10. Sprinkle the chopped Andes Mints and chocolate curls on top.
  11. Peel the parchment away from the sides and slice with a large knife. I find it easiest to slice them when the knife has been placed under some warm running water and then dried.

Saturday, January 24, 2015

chocolate peanut butter mug cake

Source:  http://www.fivehearthome.com/2014/05/12/one-minute-chocolate-peanut-butter-mug-cake/

skillet smores dip


Ingredients
  • 1 1/2 cups chocolate chips (semi-sweet, milk chocolate, or a combo)
  • 15 jumbo marshmallows, halved
  • Graham cracker squares
Directions
  1. Preheat oven to 450°F. Spread chocolate chips in an 8-inch cast iron skillet (or oven safe dish). Arrange marshmallow halves over the surface of the chocolate chips, covering them completely. Bake for 5 to 7 minutes or until marshmallows are toasted to your preference (watch closely!). Use an oven mitt to remove skillet from oven and allow to rest for 5 minutes. Serve warm with graham cracker squares or sticks.
Tips, Tricks, & Variations
Adjust the proportions of chocolate and marshmallows to your liking or to the size of the skillet or baking dish that you use. And you may use whatever you have on hand...finely chopped chocolate, mini chocolate chips, regular chocolate chips, mini marshmallows, (halved) jumbo marshmallows, etc.
It should be noted that the chocolate will probably melt more evenly (and stay melted more consistently) using a heavy cast iron skillet, which retains heat better than other types of dishes. Also, some people have found that wiping the interior of the skillet with softened butter before adding the ingredients helps with later cleanup.

Source: http://www.fivehearthome.com/2014/08/10/smores-dip-baked-in-skillet-oven/

snickerdoodle mug cake

Ingredients
  • 1/4 cup + 2 tablespoons all-purpose flour
  • 2 tablespoons sugar
  • 1/4 teaspoon baking powder
  • 1/4 teaspoon cinnamon
  • 1/4 cup milk, at room temperature
  • 2 tablespoons salted butter, melted and cooled
  • 1/2 teaspoon pure vanilla extract
  • For layering/topping:
  • 1 tablespoon sugar
  • 1/4 teaspoon cinnamon
Directions
  1. In a small bowl, whisk together flour, sugar, baking powder, and cinnamon until thoroughly, completely combined, with no streaks of any ingredients remaining. Blend in milk, butter, and vanilla until batter is smooth. Into a 14-ounce (or larger) microwave-safe mug with straight sides, scoop a big spoonful of batter, then sprinkle with a spoonful of cinnamon sugar. Alternate layers, ending with cinnamon sugar.
  2. Microwave on high for 1 to 1 1/2 minutes, or until cake is done to your liking. Allow to cool for a couple of minutes before serving.
Tips, Tricks, & Variations
A tall, cylindrical mug with straight (not angled) sides will ensure that the cake bakes evenly. I found a 14-ounce mug to be the perfect size to allow the cake to rise up while baking without overflowing. (I filled my mug to the top with water and then transferred the water to a measuring cup to determine its capacity.) If you use a smaller mug, you may want to bake the cake on top of a plate or paper towel to catch any possible overflow.
The strength of individual microwaves can vary. The first time you make this recipe, be prepared to experiment a bit to make sure that 1 minute is the perfect length of baking time. The nice thing about this cake is that even if it is undercooked, you don't have to worry about raw eggs!
Unsalted butter will work just fine in this recipe, but I find that using salted butter adds a tiny flavor boost.

Source: http://www.fivehearthome.com/2015/01/15/snickerdoodle-mug-cake/

Thursday, October 16, 2014

Cinnamon Sugar Nutella Rolls

Cinnamon Sugar Nutella Rolls - Exactly what it sounds like
Use Pilsbury crescent rolls put a scoop of Nutella in each one
Roll it up, then roll it in cinnamon and sugar.
Bake according to the package .... Then eat
Found at: MyFridgeFood.com

mini candy apples

Mini Caramel Apples
Prep time :0:15
Bake/Cook time :0:45
Yield :10 small apples, or 30 mini apples
INGREDIENTS
1 cup butter
2 cups Imperial Sugar Dark Brown Sugar
1 can (14oz) sweetened condensed milk
3/4 cup light corn syrup
1 tablespoon vanilla extract
Topping
Chocolate sandwich cookies, crushed
Colored sprinkles
Chopped nuts
Chocolate candies
DIRECTIONS
1. To clean apples, boil for 30 seconds to remove wax like coating. Allow to dry and come to room temperature before dipping. To make mini apples, use a small cookie scoop, and scoop out balls from apple. Arrange on a baking sheet, and stick a tooth pick into each apple. If making full sized apples, use a lollipop stick and place in stem of apple.
2. Arrange toppings in small bowls. You will need to work somewhat quickly once you start dipping, so caramel does not harden.
3. In a large saucepan mix together butter, brown sugar, sweetened condensed milk and corn syrup. Stirring frequently, heat the mixture to 246 degrees. If you do not have a thermometer, drop a small amount of liquid into a bowl of cold water. If it forms a soft ball it is done. Remove from heat, and stir in vanilla extract. Let caramel cool for 3-5 minutes before dipping apples.
4. Dip each apple into caramel. Gently tap stick on side of pan, and spin to remove excess caramel. Dip in desired toppings. Place on baking sheet to cool. Allow caramel to cool completely before serving.
Recipe developed for Imperial Sugar by Erin Sellin @Dinners, Dishes & Desserts.
Found at: http://www.imperialsugar.com

bloomin baked apple

Bloomin’ Baked Apples Recipe
Ingredients
2 Honeycrisp apples (or other crisp apples)
2 tbsp butter 
3 tbsp brown sugar, packed
1 tbsp flour
1 tsp cinnamon
4 caramels, unwrapped
Optional toppings: vanilla ice cream, caramel sauce and cinnamon
Instructions
1. Preheat the oven to 375 degrees.
2. To get the blooming apple look, you need to cut the apples. Slice off the top 1/4 to 1/3 of the apples. Scoop out the core. I don’t have an apple corer so I used my metal 1/2 teaspoon measuring spoon. Then, use a thin knife to make two, deep circular cuts around the center of the apple. Next, turn the apple over and make narrow cuts all the way around the apple. Flip it back over and you can see all of the cuts.
3. Place the apples in an oven safe dish and put two unwrapped caramels into the center of each apple.
4. Heat butter and brown sugar in the microwave for 30 second, stir and continue heating for an additional 30 seconds. Remove from the microwave and stir in flour and cinnamon. Divide the mixture over the top of the two sliced apples.
5. Bake at 375 for 25-30 minutes. Remove from the oven and use a large spoon to move the apples into bowls.
6. Top with a scoop of ice cream, drizzle with caramel and sprinkle with cinnamon. The ice cream will cause the caramel in the center to harden so eat quickly or put the ice cream scoop on the side.

Monday, October 13, 2014

vegan pumpkin pudding pie

15-oz. can pumpkin
1 1/3 cups nondairy creamer
1/2 cup sugar 
1/4 cup brown sugar
1/2 cup Bisquick
Egg replacer equivalent to 2 eggs
2 Tbsp. melted margarine
2 1/2 tsp. pumpkin pie spice
2 tsp. vanilla
• Combine all the ingredients in a bowl. Transfer to a lightly greased slow cooker. 
• Cook on low for 7 to 8 hours.
Makes 8 servings

Monday, September 29, 2014

funnel cake

DUTCH FUNNEL CAKES

3 eggs
2 cups milk
1/4 cup sugar
3 1/2 cups flour
1/2 tsp salt
2 tsp baking powder

Preheat oil in a cast iron skillet on medium high heat (for an electric frying pan preheat to 375 degrees). Leave room between the oil and the top of the pan to allow room for batter to be added. Beat eggs, add milk and sugar. Beat well. In a separate bowl, sift flour, salt and baking powder. Add to egg and milk mixture. Beat until batter is smooth. Batter should be thin enough to flow through the opening of your funnel. If needed, add a little more milk.

Put your finger over the bottom of the funnel and pour batter in top. Drizzle batter in hot oil making criss crosses and swirls. (I use a measuring cup with a thin spout to do this, easier for those of us less coordinated!). Let brown on bottom and then carefully flip it over with tongs to brown on the other side.

Place on a paper towel to drain for a minute or so and then serve warm with molasses, jelly or sprinkle with powdered sugar.

Photo: DUTCH FUNNEL CAKES

3 eggs
2 cups milk
1/4 cup sugar
3 1/2 cups flour
1/2 tsp salt
2 tsp baking powder

Preheat oil in a cast iron skillet on medium high heat (for an electric frying pan preheat to 375 degrees). Leave room between the oil and the top of the pan to allow room for batter to be added. Beat eggs, add milk and sugar. Beat well. In a separate bowl, sift flour, salt and baking powder. Add to egg and milk mixture. Beat until batter is smooth. Batter should be thin enough to flow through the opening of your funnel. If needed, add a little more milk.

Put your finger over the bottom of the funnel and pour batter in top. Drizzle batter in hot oil making criss crosses and swirls. (I use a measuring cup with a thin spout to do this, easier for those of us less coordinated!). Let brown on bottom and then carefully flip it over with tongs to brown on the other side.

Place on a paper towel to drain for a minute or so and then serve warm with molasses, jelly or sprinkle with powdered sugar.

Sunday, August 17, 2014

tres leches parfaits

Tres Leches-Berry Parfaits

1
package 1-layer-size white cake mix
3
eggs
6
tablespoons butter, softened
2
tablespoons water
2
tablespoons dark rum, brandy, or water
1
cup whipping cream
1/3
cup honey
1
teaspoon vanilla
1
recipe Cinnamon Tres Leches Sauce
3
cups fresh strawberries, chopped; blueberries; and/or raspberries
1/2
cup coconut, toasted (optional)
Fresh mint leaves (optional)
Cinnamon Tres Leches Sauce


Ingredients
1
ounce of sweetened condensed milk
1
ounce of unsweetened coconut milk
3/4
cup of whole milk, or half-and-half
2
inch of cinnamon
1/2
teaspoon of vanilla
Directions for sauce
  1. In a large saucepan combine sweetened condensed milk, unsweetened coconut milk, whole milk or half-and-half, and cinnamon. Cook over medium heat just until boiling, stirring frequently. Remove from heat and stir in vanilla. Transfer to a large bowl. Cover and refrigerate until well chilled. Remove the stick cinnamon and discard.

Directions for cake and building parfaits

  1. Preheat oven to 350 degrees F. Grease a 9x9x2-inch baking pan; line bottom with parchment paper or waxed paper. Grease paper; set aside.
  2. In a large bowl combine cake mix, eggs, butter, the water, and rum. Beat with an electric mixer on low speed until combined. Beat on medium speed for 2 minutes (batter will be thick). Stir in lime peel. Spread batter evenly in prepared pan.
  3. Bake for 20 to 25 minutes or until a wooden toothpick inserted near the center comes out clean. Cool cake in pan on a wire rack for 10 minutes (cake may sink slightly during cooling).Loosen cake from sides of pan; invert onto wire rack. Cool completely (cake should be cool to the touch). Using a serrated knife, cut cake into 1-inch cubes.
  4. Divide one-third of cake cubes among eight individual dessert or parfait dishes and one-third of the chilled Cinnamon Tres Leches Sauce. Among the 8 dishes divide one-third of the berries. Repeat layers times. Cover and chill for 2 to 6 hours or until completely chilled.
  5. In a large bowl combine whipping cream, honey, and vanilla. Beat with an electric mixer on medium-high speed until stiff peaks form (tips stand straight).
  6. Serve parfaits toppers with the whipped cream mixture. If desired, sprinkle with toasted coconut and garnish with fresh mint leaves.
Source: http://www.bhg.com/recipe/printview/tres-leches-berry-parfaits/

made 8/16/2014

another recipe: http://hoosierhomemade.com/tres-leches-and-berry-parfaits/

Sunday, December 30, 2012

chocolate chip cake pops

Chocolate Chip Cookie Lollipops


  • 24 Keebler® Chips Deluxe® Soft 'N Chewy cookies
  • 1 cup canned vanilla frosting
  • 24 lollipop sticks
  • 2 1/2 cups semi-sweet chocolate morsels
  • 2 tablespoons shortening
  • 1/2 cup white confectioner's coating

Directions

1. In medium bowl finely crumble KEEBLER CHIPS DELUXE Soft ‘N Chewy cookies. Stir in frosting. Shape mixture into twenty-four 1 1/2-inch balls. Insert stick into each, pressing balls around sticks. Place in single layer on wax-paper-lined baking sheet. Cover and freeze for 1 hour.

2. Meanwhile, in microwave-safe bowl combine chocolate morsels and shortening. Microwave on high for 1 to 2 minutes or until smooth, stirring every 30 seconds. Let stand for 10 minutes.

3. Dip lollipops into chocolate mixture, allowing excess chocolate to drip off. Set in cake lollipop stand or place on wax-paper-lined baking sheet. Let stand about 15 minutes or until firm.

4. Meanwhile, melt confectioner’s coating according to package instructions. Pipe onto lollipops. Let stand about 15 minutes or until firm.


Source:  Keebler Holiday Coupon Booklet 2012

Wednesday, December 19, 2012

hazelnut crescent rolls


crescent rolls usin hazelnut spread


  • 1 tube (8 ounces) refrigerated crescent rolls
  • 1/2 cup chocolate hazelnut spread, warmed
  • 1/3 cup chocolate-covered English toffee bits (optional but add great flavor)
  • Confectioners’ sugar
  1. Unroll crescent roll dough; separate into triangles. Spread each with 1 tablespoon hazelnut spread; sprinkle with toffee bits. Roll up from the wide end and place pointed side down 2 in. apart on greased baking sheets. Curve ends to form crescents.
  2. Bake at 375° for 11-13 minutes or until lightly browned. Dust with confectioners’ sugar. Yield: 8 servings.

Wednesday, November 7, 2012

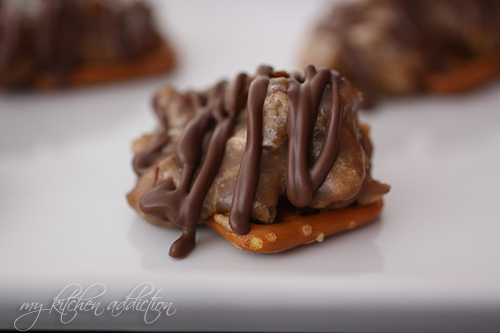
pretzel praline bites


These are so easy to make. Just make sure you have everything ready to go before you get started because the process can go quickly, and you don’t want the praline mixture to cool too much before you get it spooned onto the pretzels!
  • 36 bite sized pretzels ( square pretzel snaps)
  • 1 1/2 cups chopped pecans
  • 1 cup granulated sugar
  • 1 cup lightly packed dark brown sugar
  • 1/2 cup heavy cream
  • 2 tablespoons unsalted butter
  • Pinch Kosher salt
  • 1 teaspoon vanilla extract
  • 4 ounces milk chocolate, roughly chopped
  • 1/2 teaspoon vegetable shortening
  • cooking/candy thermometer
Arrange the pretzels on a baking sheet lined with waxed paper (or a silicone baking mat works well, too!) and set aside.

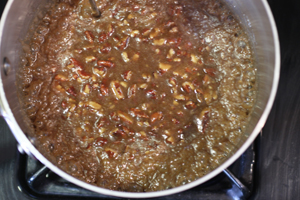
In a large heavy saucepan, combine the pecans, sugar, brown sugar, heavy cream, butter, and Kosher salt. Fit the saucepan with your candy thermometer.  Place the pan over medium-high heat and gently stir to combine. Stir only until the ingredients are combined.

Bring the mixture to a boil, swirling gently every once in a while.  Continue to cook over medium heat until the mixture reaches 236°F.
Remove from the heat and stir in the vanilla extract. Continue to stir until the mixture cools and thickens slightly. You don’t want it to be too thick, but just thick enough that it will retain its shape and not run all over the baking sheet.

Spoon about 1 tablespoon of the mixture onto each of the pretzels (the amount you use will depend on the size and shape of the pretzels you’re using).  Set the tray in a cool place for an hour or two until the praline sets.

Once the praline has set up, combine the chopped milk chocolate and vegetable shortening in a microwave safe bowl.  Microwave on medium power for about 30 seconds at a time, until the chocolate is melted and smooth.  Transfer to a squeeze bottle, and drizzle over the praline bites.

Allow the chocolate to cool and harden before transffering the praline bites to an airtight container. They will keep for up to a week.
Source: www.mykitchenaddition.com